Wednesday, 24 December 2014

Amend: Party Frock

I bought this dress from Apricot at New Look for Christmas last year. I had the choice of a size 10 that was a bit too tight across the bust, or a size 12 that was large almost everywhere else. I decided that making a large size smaller for be the easiest option!

The three noticeable areas for amendment were arm holes, waist and belt loops.

Starting with the arm holes, this was the same kind of amendment as my blue maxi dress that I wrote about in July. I put a dart in both sides, trying to prevent the gaping.


Next up, the waist band. In needed to take about two inches out of it. One option is taking it out of the side seams, but that can pull it out of line, so it doesn't hang straight. I decided to put another two darts in here, on either side on the front of the dress. I left the bottom of the darts open, to keep the fullness of the skirt.


And finally, the belt loops. This is similar to the grey dress that I also amended, because the loops were very big and stuck out really obviously to either side. I unpicked the bottom of each loop, snipped a bit off, and hand-sewed them back on.


And all this was done just in time for the main festive event. And you can't even tell from the outside that I had to make all these changes - success!


Sunday, 14 December 2014

Make: Tetris Blanket

One each of Bright Pink, Jaffa, Sunshine, Bright Green, Turquoise, Royal and Violet.

Three Black and three Charcoal.

One 4mm crochet hook.

Thousands and thousands of double crochet, single crochet, chain and slip stitches.

Nine months of evenings and weekends, train journeys, episodes of CSI, lazy mornings.


But now, my Tetris blanket is finally complete!!

I've already gone over most of the resources, techniques and design behind the blanket. So in this post, I'm going to just revel in the fact that it's complete, and I love it. This is one blanket that I am properly proud of.


Sunday, 7 December 2014

Make: More Ruffle Scarves

We've got our Christmas charity sale at work this week, for which I have been working on some more ruffle scarves similar to the one I made for my mum in September.

One scarf uses pom-pom wool, which I've never tried before. This is Rico loopy yarn, 75% acrylic / 25% nylon. The knit-up was very similar to the normal yarn, except this one has an inside edge, where you pick up the stitches, and an outside edge, with the pom-poms.


I also used some colour change yarn to make several more ruffle scarves. This is Rico Creative Can Can yarn, 100% polyacrylic. I used two 200g balls to make four scarves, two in each colour.


Hopefully these will be snapped up at the sale, to make some money for Save The Children!


Friday, 28 November 2014

Mend: Combat "Rock" Trousers

There is nothing like an imminent deadline to convince me to sit down and get something done.

For the last 10 years, I have always had a pair of "rock" trousers on the go - namely black combats covered in band badges. Since leaving university in 2009, they have seen less action than they were used to, probably because they can't be considered appropriate work attire...

What they are appropriate for, however, are gigs! But only when they don't have a huge hole in the backside...


They have been ripped for several months now, sitting proudly as part of my Mending Pile. What it took to finally get them under the sewing machine, was a gig! We were going to see my favourite band, Linkin Park, on Monday evening, so on Saturday, I sat down to repair them.

I have a certain style of patching ripped clothes, notably involving contrasting fabric. I had some bright blue satin leftover from a party dress I had aged 8, which I thought would look really cool! Being satin, however, I had to line it with interfacing to make it hardier. This is the reinforced patch piece being held horizontal.


I used iron-on interfacing because... Well frankly, it just keeps life simple. First, I tacked the patch in place on the inside using contrasting thread.


I used a straight stitch about a half centimetre from the tear to hold it in place. Then turned it inside out, trimmed the patch, and went on to use a zigzag stitch to oversew the edges - all this in matching black thread so you can't see it on the right side.


After tying off all the threads and making sure nothing was going to unravel, I turned the trousers back out the right way, et voila! Hopefully this should be strong enough to withstand the rigours of rocking out...


Oh, and they did get tested on Monday, and they stood the test of Linkin Park!


Sunday, 2 November 2014

Make: Poppies

Remembrance Poppies are used to commemorate those who have died at war. In the weeks leading up to Remembrance Sunday, they are worn prominently, particularly in the UK, with donations going to support current and former military personnel.

This year for the second time, the Barclays Knitting Group made knitted poppies to sell for charity. Last year, I made lots of knitted poppies, but up until this weekend I hadn't made any this year.

All that changed this weekend when this happened!


Watch out work, the poppies are coming!

Friday, 17 October 2014

Make: Granny Square Blanket

I taught myself to crochet in March this year using videos from YouTube. After learning the basics of chaining, single and double crochet, I took on one of the classics - a granny square.


I used some acrylic yarn, a size 4 hook, a whole bunch of websites and more YouTube videos. Many, many hours were spent crocheting round and round and round... Until I had a finished blanket!


After finishing a crocheted project, it will often buckle or bow around the edges. In order to flatten and straighten out a piece, you can block it - wetting the knitting or crochet to relax the yarn and reshaping it whilst it's wet, so it dries in the desired shape. I did this to my blanket, to finish it off ready for use!

I couldn't have learned how to do this without help from YouTube. There are so many crafters out there posting helpful How-To videos, so I wanted to pass on the torch with my Blocking Basics video. Hope it helps any amateur blockers out there!

Monday, 13 October 2014

Make: Fingerless Gauntlets

Giving these gloves the name "gauntlets" makes them sound very military - however, I'd challenge any uniform to sit comfortably next to this much rainbow colour (except perhaps the Colour Guard, MEGALOLZ no?)


I started making these in April when we were skiing in the Alps, but have only just gotten round to finishing them. I blame Tetris. They are crocheted using a 4mm hook and some amazingly bright rainbow yarn that I've lost the label for. 


I hate wearing normal gloves, as they make my hands feel super clumsy. I doesn't help that I am, even bare-handed, quite clumsy already. So I always opt for fingerless ones when I can. Hopefully the gauntlet sleeves will also help keep the draught from getting to my wrists.

I have also taken this rainbow opportunity to use a few beads that I've had lying around for YEARS. I think I got them free with Mizz magazine when I was about 12...


Finished just in time, judging by the awful weather outside!

Wednesday, 1 October 2014

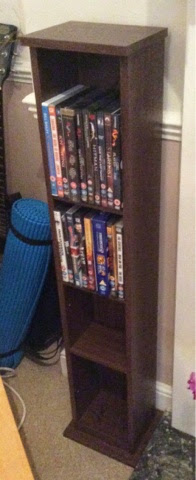
Make: DVD Shelf

Does this count as a proper Make? It had pieces, a pattern and I did actually "make" it... So I think it counts!


I love building flat-pack furniture... There's something very satisfying about lining up all the pieces ready to go, then fitting them all together!

My only issue with this shelf, is why are the shelves all different sizes?! Was it too difficult to take the total height and just divide by four? If I get more bothered by it, I'll get the drill out and Amend...


Tuesday, 23 September 2014

Amend: Zip Fastenings

I finally completed two mini-amends this weekend - the kind that don't prevent you from wearing something, but as soon as you put it on, you're reminded about it.

The first was on a green gypsy skirt, where the top of the side zip would be scratchy & irritate my hip. It needed something to cover the top of the zip. I opted for some ribbon, mounted on the inside and sewn through only one layer, so the stitches don't show on the outside.


Of course, this has to be detachable, to allow the skirt to go on and off. I used a popper for this.


Worth noting is that ribbon like this will fray at the end when cut. My preferred technique for this is to hold it near (but not in) the flame of a candle, till the end curls up and goes black right along the edge. For this to work, I think it has to be manmade fibres, ie. not cotton or silk. I don't know the science!

The next fix was on a dress with a zip up the middle of the back. I had previously put a hook and eye at the top of this zip, as an additional fastening.


However, on wearing it, I realised I must've sewn it on the wrong way, as it was almost impossible to do up myself. I'd end up looking like I was doing some kind of contortionist yoga trick*. To avoid this, I turned the hook around! We'll see next time I wear it if I got it right this time...


*Disclaimer: I have never done yoga, so have no idea what "tricks" or positions actually look like.

Sunday, 21 September 2014

Make: Knitted Ear-Warmer

I bought some Drops Eskimo Print in the sale on Wool Warehouse. It's a 50g ball of chunky 100% wool, rather than my usual (cheaper) yarn, destined for size 8mm needles. I decided to design my own pattern to make an ear-warmer. I'm not great at pattern descriptions but let's have a go!

Use circular needles, 40 or 60mm long, size 6 (I think that means 6mm...)

Cast on 71 stitches and join, to knit in the round
Row 1: p1, *k1, p1* repeat to end
Row 2: k1, *p1, k1* repeat to end
Row 3: *k5, k2tog, yo, k2tog, yo* repeat to end (8 times)
Row 4: k all

Repeat rows 3 and 4 eight times, until piece measures approx. 8cm
(As you do this, the start point will move round by one stitch each time, creating the swirl)

Row 22: repeat row 3
Row 23: p1, *k1, p1* repeat to end
Row 24: k1, *p1, k1* repeat to end
Cast off and weave in ends.

Et voila! Mine took about 2hrs to make - love chunky wool.


Note for pattern repeat - I'm really not sure I've done a good job of describing it properly. That description above is how I thought of it. Here's a close-up of the finished pattern, to help improve the understanding of my instructions above.


And a wee diagram too, showing the progression of row 3. The pattern is worked from the bottom right, moving across and up.
 
Pink = knit as usual
Yellow = k2tog
Green = yo


Good luck with that!

Sunday, 14 September 2014

Make: Ruffle Scarf

It was my mum's birthday this week and I wanted to make something for her, to go with some diamond sparklies from me & the other Grenham siblings.

I grew up in Mansfield, using a haberdashery called Sally Twinkle. I recently found out they had a new website and when I went on to browse, I inevitably ended up buying things! Among my purchases, some turquoise mix Four Seasons Gründl Butterfly Color yarn.


I took it on the train up to Newcastle for the Great North Run last weekend, with some size 6 needles. The yarn is special - it is a webbed yarn. You knit it by picking up the edge loops in the web, in the bottom of this picture. The rest of the width of the web forms the ruffles.

 
These types of yarns always come with instructions, though of varying quality. Mine were translated from German and not entirely clear - but fortunately I've made one before, so that wasn't too much of a problem for me. For anyone without that experience though, I'd suggest some YouTube tutorials first!
 
About an hour of knitting on the train, then maybe two that evening and... ta-da!


And the extra good news is... my mum loved it!


Wednesday, 10 September 2014

Update: Tetris Blanket

NEWSFLASH!

All 160 Tetris squares are now complete! Including all the final black ones!


Saturday, 30 August 2014

Mend: Buttons & Holes

I've had a bit of a mending sesh today, to try to clear a few items from my to-do basket.

Button 1 was a decorative button on the back of a pair of shorts. This was a flat button with four holes and didn't need to be sewn on particularly well, as it doesn't hold anything down and isn't functional.


Button 2 was on a pair of chinos, at the top of the fly. This one needed to be sewn on very firmly, as not only is it only a two-hole button, but it is also a functional button. The method I use is to double up the thread, sew several loops to attach the button, knot it off, then sew several more loops, before tying it off finally.


Button 3 is a covered shank button, meaning it is covered in fabric that matches the dress it is part of and has a small protrusion on the back with a hole through to attach it to the fabric. When these come off, they often tear the fabric of the dress, meaning you have to repair the rip as well as reattaching the button.


My final repair was a small hole in the skirt of a chiffon-esque dress. This was a tough one, trying to sew up a hole without pulling the delicate fabric into a single point. I'm not sure how obvious this will be when I put the dress on - I'll just have to test it later!


Wednesday, 27 August 2014

Update: Tetris Blanket

I've been planning the border for my Tetris blanket. I'm thinking of something along the lines of this intricate sketch...


Sunday, 24 August 2014

Update: Tetris Blanket

Today is an epic Tetris day, because...

I FINISHED THE LAST COLOURED SQUARES!!


That means I have crocheted a total of 112 rainbow-coloured squares. I have also done 27 black squares, meaning I now have (only) 21 black squares to make to finish the required number for the final blanket.


To give an idea if scale, that means I have to crochet up this entire ball of wool. Sounds simple? This one ball is 295m long. That is almost three quarters of the way around a running track!

As Captain Oates (no, not the horse from The OC, this one) said, I may be some time...
 

Wednesday, 20 August 2014

Update: Tetris Blanket

I've been put off my feet for a few weeks, as I've had an operation on my leg. I have to keep it elevated and resting, which means lots of time on the sofa!


I thought it would a good time for a Tetris blanket update! I have officially completed row #12 of the 16-row blanket plan, so it's 75% complete!

I'd like to start crocheting these together soon...

Thursday, 14 August 2014

Finished: Holiday Cross-Stitch

I've not been very well this week, which has made me very fed-up and miserable. However, it has at least given me extra time to work on the holiday cross-stitch... And so it's now finished!


After finishing all the stitching, I washed it in lukewarm water & fairy liquid, then dried it flat in the airing cupboard overnight. Once dry, I put it stitching-side down on a towel and ironed it on a medium heat, to remove any creases.

Et voila!

The original pattern had the word "Welcome" written across it, but it changed this to "la plage" meaning "the beach" in French, as I did a lot of the final stitching in St Jean de Luz on the French Atlantic coast. Also, I always initial my finished cross-stitch pieces, hence the SEG in the bottom left corner.

Now I just need to find a suitable frame for it, and then find it a home on the bathroom wall!