Friday, 28 November 2014

Mend: Combat "Rock" Trousers

There is nothing like an imminent deadline to convince me to sit down and get something done.

For the last 10 years, I have always had a pair of "rock" trousers on the go - namely black combats covered in band badges. Since leaving university in 2009, they have seen less action than they were used to, probably because they can't be considered appropriate work attire...

What they are appropriate for, however, are gigs! But only when they don't have a huge hole in the backside...


They have been ripped for several months now, sitting proudly as part of my Mending Pile. What it took to finally get them under the sewing machine, was a gig! We were going to see my favourite band, Linkin Park, on Monday evening, so on Saturday, I sat down to repair them.

I have a certain style of patching ripped clothes, notably involving contrasting fabric. I had some bright blue satin leftover from a party dress I had aged 8, which I thought would look really cool! Being satin, however, I had to line it with interfacing to make it hardier. This is the reinforced patch piece being held horizontal.


I used iron-on interfacing because... Well frankly, it just keeps life simple. First, I tacked the patch in place on the inside using contrasting thread.


I used a straight stitch about a half centimetre from the tear to hold it in place. Then turned it inside out, trimmed the patch, and went on to use a zigzag stitch to oversew the edges - all this in matching black thread so you can't see it on the right side.


After tying off all the threads and making sure nothing was going to unravel, I turned the trousers back out the right way, et voila! Hopefully this should be strong enough to withstand the rigours of rocking out...


Oh, and they did get tested on Monday, and they stood the test of Linkin Park!


Sunday, 2 November 2014

Make: Poppies

Remembrance Poppies are used to commemorate those who have died at war. In the weeks leading up to Remembrance Sunday, they are worn prominently, particularly in the UK, with donations going to support current and former military personnel.

This year for the second time, the Barclays Knitting Group made knitted poppies to sell for charity. Last year, I made lots of knitted poppies, but up until this weekend I hadn't made any this year.

All that changed this weekend when this happened!


Watch out work, the poppies are coming!

Friday, 17 October 2014

Make: Granny Square Blanket

I taught myself to crochet in March this year using videos from YouTube. After learning the basics of chaining, single and double crochet, I took on one of the classics - a granny square.


I used some acrylic yarn, a size 4 hook, a whole bunch of websites and more YouTube videos. Many, many hours were spent crocheting round and round and round... Until I had a finished blanket!


After finishing a crocheted project, it will often buckle or bow around the edges. In order to flatten and straighten out a piece, you can block it - wetting the knitting or crochet to relax the yarn and reshaping it whilst it's wet, so it dries in the desired shape. I did this to my blanket, to finish it off ready for use!

I couldn't have learned how to do this without help from YouTube. There are so many crafters out there posting helpful How-To videos, so I wanted to pass on the torch with my Blocking Basics video. Hope it helps any amateur blockers out there!

Monday, 13 October 2014

Make: Fingerless Gauntlets

Giving these gloves the name "gauntlets" makes them sound very military - however, I'd challenge any uniform to sit comfortably next to this much rainbow colour (except perhaps the Colour Guard, MEGALOLZ no?)


I started making these in April when we were skiing in the Alps, but have only just gotten round to finishing them. I blame Tetris. They are crocheted using a 4mm hook and some amazingly bright rainbow yarn that I've lost the label for. 


I hate wearing normal gloves, as they make my hands feel super clumsy. I doesn't help that I am, even bare-handed, quite clumsy already. So I always opt for fingerless ones when I can. Hopefully the gauntlet sleeves will also help keep the draught from getting to my wrists.

I have also taken this rainbow opportunity to use a few beads that I've had lying around for YEARS. I think I got them free with Mizz magazine when I was about 12...


Finished just in time, judging by the awful weather outside!

Wednesday, 1 October 2014

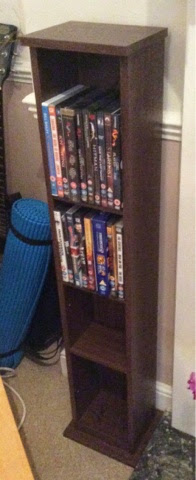
Make: DVD Shelf

Does this count as a proper Make? It had pieces, a pattern and I did actually "make" it... So I think it counts!


I love building flat-pack furniture... There's something very satisfying about lining up all the pieces ready to go, then fitting them all together!

My only issue with this shelf, is why are the shelves all different sizes?! Was it too difficult to take the total height and just divide by four? If I get more bothered by it, I'll get the drill out and Amend...


Tuesday, 23 September 2014

Amend: Zip Fastenings

I finally completed two mini-amends this weekend - the kind that don't prevent you from wearing something, but as soon as you put it on, you're reminded about it.

The first was on a green gypsy skirt, where the top of the side zip would be scratchy & irritate my hip. It needed something to cover the top of the zip. I opted for some ribbon, mounted on the inside and sewn through only one layer, so the stitches don't show on the outside.


Of course, this has to be detachable, to allow the skirt to go on and off. I used a popper for this.


Worth noting is that ribbon like this will fray at the end when cut. My preferred technique for this is to hold it near (but not in) the flame of a candle, till the end curls up and goes black right along the edge. For this to work, I think it has to be manmade fibres, ie. not cotton or silk. I don't know the science!

The next fix was on a dress with a zip up the middle of the back. I had previously put a hook and eye at the top of this zip, as an additional fastening.


However, on wearing it, I realised I must've sewn it on the wrong way, as it was almost impossible to do up myself. I'd end up looking like I was doing some kind of contortionist yoga trick*. To avoid this, I turned the hook around! We'll see next time I wear it if I got it right this time...


*Disclaimer: I have never done yoga, so have no idea what "tricks" or positions actually look like.

Sunday, 21 September 2014

Make: Knitted Ear-Warmer

I bought some Drops Eskimo Print in the sale on Wool Warehouse. It's a 50g ball of chunky 100% wool, rather than my usual (cheaper) yarn, destined for size 8mm needles. I decided to design my own pattern to make an ear-warmer. I'm not great at pattern descriptions but let's have a go!

Use circular needles, 40 or 60mm long, size 6 (I think that means 6mm...)

Cast on 71 stitches and join, to knit in the round
Row 1: p1, *k1, p1* repeat to end
Row 2: k1, *p1, k1* repeat to end
Row 3: *k5, k2tog, yo, k2tog, yo* repeat to end (8 times)
Row 4: k all

Repeat rows 3 and 4 eight times, until piece measures approx. 8cm
(As you do this, the start point will move round by one stitch each time, creating the swirl)

Row 22: repeat row 3
Row 23: p1, *k1, p1* repeat to end
Row 24: k1, *p1, k1* repeat to end
Cast off and weave in ends.

Et voila! Mine took about 2hrs to make - love chunky wool.


Note for pattern repeat - I'm really not sure I've done a good job of describing it properly. That description above is how I thought of it. Here's a close-up of the finished pattern, to help improve the understanding of my instructions above.


And a wee diagram too, showing the progression of row 3. The pattern is worked from the bottom right, moving across and up.
 
Pink = knit as usual
Yellow = k2tog
Green = yo


Good luck with that!