Saturday, 23 May 2015

Amend: Red Skirt

I bought this dress from eBay yonks ago for about £8.


While I loved the colour and the skirt, the top just didn't fit me. This was most noticeable across the back where it gaped a lot.


I'd decided I could take the top off and just keep the skirt, but had never gotten round to actually doing it. However my imminent house-move is spurring me into either finishing off or throwing away... 

I carefully unpicked the two halves just above the gold-coloured waistband.


The original dress had a zip running right up the back, which I would need to keep for the skirt to fit. After cutting it off at the appropriate point, I oversewed the zip-teeth so that the zip puller wouldn't just come shooting off the end (similar mistake made one British Sewing Bee this year - getting it back on is nigh-on impossible).


I tucked the zip ends inside the waistband by hand, tacked down the top economic the inside and then cracked out the sewing machine. This line of stitching had to be super-straight, otherwise the waistband would pucker.


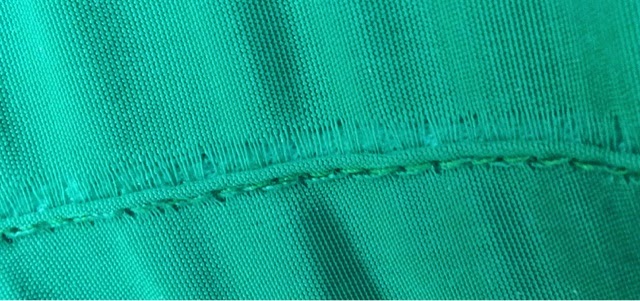
The skirt is made of a slippery chiffon-type fabric, meaning any strain on seams can tear the fabric. A way to help prevent this is to sew a double seam, so they share any strain put upon them. I did this for the top of the waist, and also used zigzag to oversew the raw edges, to stop them fraying. This is the closest match I could achieve on my basic sewing machine to match the industrially-sewn red edge.


Turning to the right side, I top-stitched the bottom of the waistband where it met the pleats, to prevent the top hem rolling over.


And there you have it! One finished skirt, which has since been worn several times already. Much better than leaving the dress to gather dust or just throwing it away.


P.S. Unrelated to this Amend, but of amusement while writing this post, every time I write "oversewed" on my iPad, it autocorrects to "oversexed". Hopefully I have spotted this autocorrect-fail and not been caught out... Thanks Apple, thanks a lot.


Friday, 10 April 2015

Mend/Amend: Green Skirt

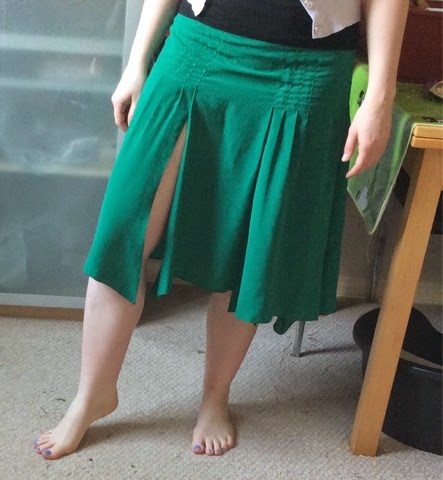
I bought this skirt several years ago, in the sale at Warehouse. I used to wear it quite a lot, as I loved both the colour and cut. It's quite unusual, in that it's basically a gypsy skirt, but split into panels with slits. Many boyfriend-points were won for the slits...


It is made of quite a thing, satin-y polyester, which floats really nicely as you walk (especially up and down stairs). Unfortunately, this material was struggling to take the strain on the seams, and the material was almost tearing. This shot is from after it was lined, but you can see through the top fabric to the back one.


In order to keep wearing it, I would need to line it. I had a jersey cotton green miniskirt which I no longer wore, so I cut the elasticated bit off of that, so I could use the rest as a lining.

I pinned and hand-stitched the jersey under the overlocked inside edge of the main waistband. The skirt has multiple vertical pleats, with overstitched edges. I used the sewing machine to sew over the top of these pleats, to better attach the lining all the way round.


From the inside, the lining now forms a second-layer of skirt.


But from the outside, it's invisible!


Now a quick press, and it's ready for summer - I hope the British weather agrees...

Tuesday, 17 March 2015

Make: Carrot Cake

Carrot Cake, Carrot Cake, have ye any nuts?

Yes, in fact this carrot cake has plenty!


I've never made a carrot cake before, but I thought I'd rise to the challenge when the boyf asked for one for his birthday. Well, after my initial reaction of, "What!? Not a dinosaur-shaped sponge!?"

Om nom nom! Thanks for the help, Mary Berry!


Sunday, 15 March 2015

Amend: Acid Yellow Dress

I recently bought a small army of £15-and-under from Dorothy Perkins, with the idea of keeping just two of them. I love colour, so had quite a range of dresses, one of which was in acid yellow... So... Not a colour I'd usually pick out... But there was something about the dress that caught my eye.


The straps were unfortunately a little too long, but I liked the dress enough that I decided to shorten them. I unpicked what I though would be maybe two lines of stitching holding them in place... This turned out to be more like FIVE! Needless to say, I had to be very precise with the unpicker.
 

After working out how much needed to come off each side, I chopped the excess fabric and overlocked the raw edges. I then slipped the straps back inside the fabric envelopes and stitched them into place, first by hand and then with the sewing machine.
 

The top of the zip seemed to want to come down by itself, so when I just happened to find some yellow elastic lurking in my sewing box, I added a quick button and loop for some security.


I also had to do a bit of a fix on the beaded waistband, where some of the pewter-coloured beads were looking a bit loose. This was tricky, as I was trying to pull tight the original threads, which weren't very long and didn't give me much to play with.
 

I had the idea of wearing this dress to my friend, Jen's, hen-do - however, then I found out it was 1920s themed. Turns out, they didn't really wear that much acid yellow polyester in the 1920s... But they did wear lots of fringing! And I just happen to have leftover from a previous prohibition-era party! Of course.


I machined some fringing to the neckline and hand-stitched some around the bottom.
 

And to finish off the 1920s theme, I cut those annoying coat-hanger ribbons off each side, plaited them with a black ribbon and added some elastic to the back, to make a headband!
 
It was a really fun hen-do and everyone pulled out all the stops to form a troupe of fantastic flapper-girls. Happy Hen-Do, Mrs Shepherd-To-Be!


Sunday, 15 February 2015

Make: Fleecy Turtle Blanket

I'm not the only member of my family who loves a blanket - my sister is also a blanket fan. This is perhaps unsurprising given she is at uni in Scotland, which is Northern and cold...

In a Deramores sale I found this James C. Brett Fluffy Chunky yarn for about £2 for each 50g ball. A search on Ravelry for a chunky crochet blanket and I came across this turtle-design baby blanket, which I thought was very cute! I've never crocheted hexagons before, so this would be a good challenge.


Although I used the pattern as inspiration, I didn't follow the complicated hexagon pattern described, mainly because the fluffiness of the yarn meant you couldn't even see individual stitches, let alone if it was a "DC" or a "DCBP"... Instead, I used pairs of double crochet with one chain between each nodule. Each hexagon has two rounds of green, one round of blue, then uses a flat-braid join in white as a border and to join the hexagons together.


The neat mathematical part of my brain really loves the way they tessellate so neatly together! I made 63 hexagons in total to form the body of the turtle. Then using the green, I added some legs, a head and a tiny tail at the bottom - to make a pretty good turtle, if you ask me!

 
In total, I used two balls of white, three of blue and five of green. £20 of yarn to make a very warm, very snuggly, very special one-off blanket for a very special sister. Happy Birthday Schwesterchen!
 

Monday, 9 February 2015

Mend Weekend

I've been working on a medium-term project for a while, which I'll update on next week. But this weekend, I also finally got round to mending a few things that have been needing a bit of TLC.

My combat trousers that I fixed in November were in need of a bit more attention, though less serious this time in that it was just the button that had come off. It's an odd button, as it attaches on with a wide band, rather than with holes for thread.

I'd fixed it before with some green ribbon, which hadn't lasted too long. So this time, I triple reinforced it...


Then there were my fluffy slippers, bought from Accessorize only in September. The pom-poms on one side had come off, so I used some yarn and a darning needle to do a swift repair.


All while sitting on the floor in the spare room, exercising our fat little guinea piglets... It's not much, but it's a start!

Wednesday, 21 January 2015

Make: Table Runner

I had some rainbow yarn left over from my Rainbow Gauntlets, but not quite enough for a real project. I searched online for some more of the same YarnArt "Dancing Baby", and managed to find some being sold in Turkey (I love the Internet!)

However, when it turned up, it was of a much poorer quality than the original yarn, especially the dye quality, so I couldn't really mix the two as planned.


I crocheted it up into five big squares anyway, and decided that the slightly chunkier yarn would be quite heatproof, so I decided to make them into a table runner.


I joined them using the Flat Zipper method described here. This method was not the fastest way to join crochet squares but I quite like the effect!


Now I just need a dining table to put it on...