Thursday, 11 February 2016

Make: Crochet Booties

We're putting on an Easter and baby wear charity sale at work, for which I decided to learn how to make booties. It's been a while since I did much crochet, so I wanted a crochet pattern. When I found this one on Ravelry, I knew I had to try it.

It took me a few attempts at the sole, but I did finally get it right.


After watching several YouTube videos to explain all the stitches (BP-hdc? Hdc2tog?) I managed to put the rest of it together. It wasn't the simplest pattern to follow - in fact, I'm pretty sure I got this wrong in a number of places... But it still looks good!


And the second?


It seems we have a pair!

Time to work on some other colours...

EDIT

This is what they should look like, if you follow the pattern...


Sunday, 24 January 2016

Make: Bias-Knit Sweater (1)

A few years ago, my sister's flatmate abandoned some very nice Debbie Bliss Rialto 4ply yarn in a maroon/claret colour. She knew I'd love to adopt the yarn, which needed quite a delicate pattern. I found this one online - it's from the 1950s magazine "Women's Day".


As an aside, there are some properly vintage knits in Women's Day - this is what Google images yields...


I started this jumper literally years ago and I don't actually have any pictures of the initial make phase. I came across the half-knitted jumper front when we moved house and added it to my To Finish file. It took about an hour to work out where I was on the pattern, and to figure out I was missing two stitches... But two outta 228 ain't bad!


I realised I wouldn't have enough of the maroon yarn, so I went online to order more - but it seems they don't make the 4ply in this colour any more! After an exhaustive and ultimately unsuccessful search, I instead decided to use a complimentary colour - mallow.

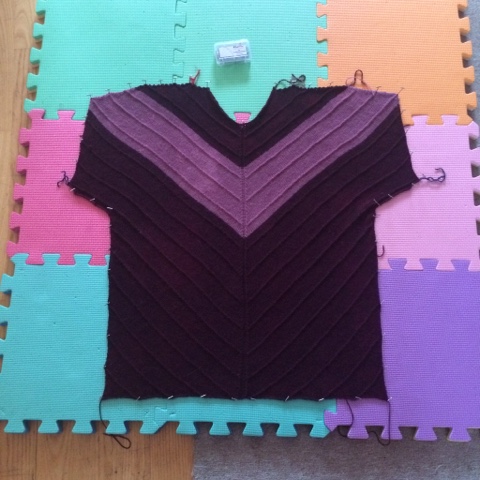
And today, I finished the front half of the sweater!


The pattern uses mostly stocking stitch on the diagonal, with knit rows to make the raised ridges. Contrastingly, you also use knit stitches for the channel up the middle - so some knit stitches stand out, some back. Go figure.


I used the mallow yarn for a V-shape across the shoulders - then for the reverse I will knit mostly in mallow, with a maroon V.


Now I just have to get on with the reverse! Let's hope it's not another few years...

Tuesday, 5 January 2016

Make: Norway Cross-Stitch

Back in March 2012, the Boyf and I went on holiday to Tromso, in the north of Norway. I really wanted one of those proper Nordic jumpers... but alas, they were about £300, which I just couldn't justify for something reputed to be a super-warm, super-itchy piece of knitwear. We popped into a craft shop, under the illusion that I might buy a pattern and knit my own, when I spotted a Norway cross-stitch pattern.

 
So that was almost four years ago. Since then, I've moved house twice, one of which I've bought, changed jobs, and moved from what could definitely be referred to as "mid-twenties" to what can only loosely and slightly misleadingly be described with the same moniker.
 
I've been doing bits and bobs of the cross-stitch fairly randomly over these four years, but I have really tried to focus on it over the last six months. And it is finally complete!


The whole piece is about 25cm wide and over half a meter long!


At the top alongside the Norwegian flag are some Arctic circle locations - Tromso, where we visited, Hammerfest (home of "The Royal and Ancient Polar Bear Society"), Kirkenes and Nordkapp, almost as far north as you can go without leaving Europe.


Then comes fish in Mo I Rana, flowers Molde and Trondheim's Nidaros Cathedral.

 
Bergen's colourful houses and Lillehammer's Garmo stave church line up nicely next to each other, and then comes the ski-jump from the Oslo Winter Olympics, in front of a longboat from the Viking Museum.


The whole piece has a border in the colours of Norway's flag, and it features a number of snowy mountains, ocean scenes and flowers. These could be Norwegian "bergfrue"


There is a gate to the Old Town in Fredrikstad on the left, and Kristiansand's "Kardemomme by" features a couple of jaunty crabs.


The oil rig for Stavanger was real fun to sew; when it was just the blocky cross-stitch, it didn't really look like anything special, but the backstitch just brings it alive!


I also enjoyed sewing the Arctic Cathedral from Tromso, of course. These are our own photos from our holiday there! I'd say it's a pretty good representation...


It was an amazing holiday and I can't wait to get my sewing framed and up on the wall!

Monday, 21 December 2015

Make: Shift Dress

Yesterday I went on a “Make a Dress in a Day” course with the Fashion Box, based up near Seven Sisters. A few people have seemed surprised that I took myself on a course aimed at beginners; my reasons for doing it were that I’ve never made a full dress from scratch, I’ve never used a commercial pattern, I thought I’d learn some new techniques and, if I’m honest, it sounded fun.


The pattern pieces were made from very thin tissue paper, and covered in various markings to show the different sizes, lengths and fitting marks for each one. Fortunately, the pieces had been precut for us, with all the markings transferred from the tissue-paper pattern to the fabric pieces, meaning we could get on with the sewing, rather than getting covered in tailor’s chalk.
 
There were two bust darts, one on either side of the front piece – these had to be pinned and sewn identically, as it would be really obvious if they were uneven.

 
Then two back darts that also had to be symmetrical.
 
 
A dart is a method of curving fabric so that the 2D material fits around a 3D body. On the outside they look like lines and on the inside there will be a triangle of spare fabric.
 
Next, I got to use what is possibly my favourite machine in the world – the overlocker. This has four reels of thread that combine with a cutting knife to slice your fabric in a really neat line and bind the raw edge, to prevent fraying. I love this machine and would really like one for myself...


The fabric goes in rough and straggly, but comes out neatly overlocked!


Next step was to put in an invisible zip down the back. I learned that there is a special sewing machine foot you can use for putting in invisible zips that helps keep everything lined up – this made it so much easier! And explains why I had so much trouble trying to do it with a normal zipper foot.

 
Putting in a zip can cause the fabric to pucker, as the sewing machine tries to pull the fabric through at a different speed to the zip.


Fortunately a bit of ironing helps relieve the problem!
 

Next step was to sew the bottom part of the back seam and get it to join up flawlessly with the bottom of the zip. I’d say I did a pretty good job – it’s hard to tell where the zip starts!
 

For the neckline, we used a facing combined with iron-on interfacing to strengthen the material. I used this interfacing previously when I made a tie.


Next the curved seams at the armholes and neckline had to be pinned and sewn. (Fortunately there was no tacking involved, phew.)
 

Sewing the side seam brought the two pieces of the dress together as one, and then I learned the handy trick of putting in the straps, which involved some simple flipping the straps, inserting into the back, sewing, turning out and voilĂ … In all honesty I’m not sure how this bit worked (witchcraft?) but it really did! 
 
Then, time for some pressing and a bit more overlocking…


Finally came the hem – now there are two ways to do a hem. One involves using neat straight stitch, and I’ve done this a bunch of times. Examples are on my many curtain-related posts. But there is a stitch on my machine specifically for sewing invisible hems… **mysterious** I know, but I thought I would give it a go.
 
And here is the finished hem, on the outside! Pretty darn good, I’d say, and certainly something I’ll use again.
 
 
So here is the finished dress!
 

I’d just like to take an additional moment to note how the back facings are perfectly aligned with each other… This is not a part of the dress you’ll see usually, but it melts my heart just a little bit that they are so even. Cos I’m both a perfectionist AND a loser.
 

Unfortunately the dress does not currently fit me very well… Watch this space for when it makes a reappearance as an “Amend” in the New Year!
 

Friday, 18 December 2015

Make: Christmas

The Boyf and I finally got round to getting a bit festive last weekend - we cracked out the carols, put up some twinkly illuminations and found the address book, before sitting down to start some Christmas cards.

We were inadvertently delayed by my discovery of a Make You Own card set that I received from Santa last year. It promised me that all I needed was "imagination" so I thought it would be a fun and speedy job.


Alas, I also needed glue, which meant things got a bit messier and therefore time-consuming than anticipated... Two hours later and the side was covered in little bits of card, sequins and glue, all held together by clothes pegs.

Next day though, when everything had dried satisfactorily... Ta-da!


I also decided to fill the house with Christmassy smells. Since we have no tree to make the place smell of inviting pine, I went for gingerbread!

I have never made gingerbread before, but I found a recipe on the BBC website that seemed relatively simple - and we had all the ingredients in that I'd need too, which is handy when I'm still a bit crippled (sprained ankle).

The recipe said that it made 20 gingerbread men, but it turned out to make many more than that in other shapes! First up, some daintily decorated snowflake patterns...


Next, an army of melting snowmen! The unfortunate thing about this design is that marshmallow packets all seem to come in both white and pink - you can only use the white ones, so the pink ones just went to waste... True story? Tummy says nope.


Can you see the completely evil one? He's quite sinister...

And finally, this is only really Christmassy in that it was given as a present. Tetris biscuits!


And of course, it matches. I'm no amateur.


Friday, 4 December 2015

Make: Curtain Wall (3)

Well it’s fair to say, this became quite a sizeable job. But I have finally finished hemming the last curtain for our "guestroom" curtain wall! And here it is in all its glory!


The button-up tab tops work like a dream, too! When the curtains are removed, the curtain rail is barely visible.


To add a final flourish, I added some braiding to the edges - because sometimes, a little embellishment makes something look all the more professional.
 
 
I may make adjustments in the future, perhaps with dots of Velcro on the edges to hold the “wall” together better, or to keep more light out. I still need to work out the best way to store them, too. But for now, we officially have our “guestroom” completed!